Policy Builder user guide
OVERVIEW
In Homepage For You, Taboola’s editorial recommendation engine matches users with their optimal experiences based on their interests, location, time of day, what’s trending and much more. But editorial teams set the rules of engagement for those matches, determining explicitly which articles, videos and galleries are available in the recommendable inventory at any given moment. Policy Builder is the tool to create these guidelines, called “policies.”
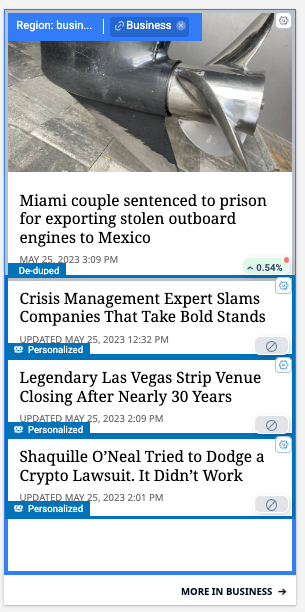
A homepage in HP4U is comprised of distinct regions, such as “breaking news” or “local sports”, which are defined by the publisher in the initial implementation phase. These regions can contain any number of slots for content. A business region might contain 4 content positions, as in the image below.
An editorial team will use Policy Builder in Taboola Newsroom to create policies for regions, determining the content that is available to be recommended for personalization in that area. The Policy Builder tool is accessed in Newsroom’s left rail navigation under Homepage For You.
In short, a “policy” is a series of filters and parameters based on structured data properties like URL or meta tags — fields which are mostly unique to each publisher. They will include settings like category, age of content, content type, content source, paywall status etc. These parameters are available as both inclusions and exclusions.
Example: A publisher has a four-item homepage module and wants it to feature personalized recommendations that are only staff-created entertainment and lifestyle content from the last three days, excluding branded content, and limited to only articles and video.
SETUP AND CONFIGURATION
The following general steps must be completed before a user can begin to create and assign policies to regions of a page:
- Content mappings must be completed to determine what custom filters are available
- Homepage For You must be enabled
- All regions must be tagged, mapped and validated
- All slots must be properly tagged and validated
- Newsroom must be implemented
For full instructions, consult the documentation in Taboola’s Developers’ Center.
Note: All critical fields of content-level pages must be properly mapped, including fields like category, timestamp, paywall status, content type, etc. before policies are created in Policy Builder. This step is completed by Taboola’s Professional Services team, although many of the mappings are done as part of initial onboarding with Taboola.
Example: An article might contain structured data such as:
<meta property=”og:type” content=”article”/>
<meta name=”is-wirestory” content=”false”/>
<meta property=”article:opinion” content=”true”/>
These could be used to, for example, to create rules that include or exclude wire service content or opinion content or restrict recommendations to articles only.
Please contact your account manager if some properties are not mapped and available in Policy Builder.
POLICY TYPES
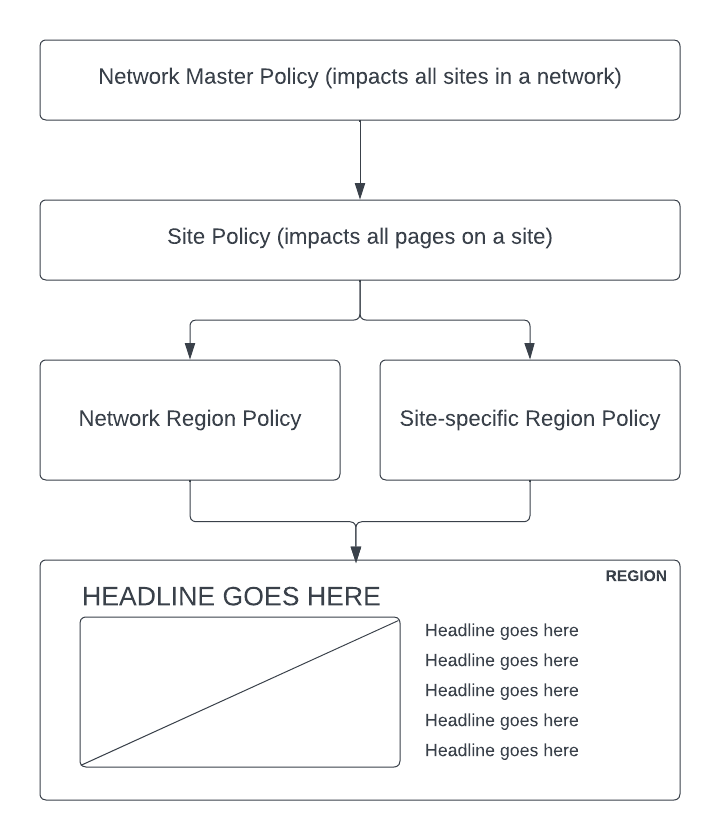
For a single site, there are currently two types of policies in Homepage For You: Site Policies and Region Policies. They exist in a two-tiered hierarchy where the properties of Site Policies cascade down to Region Policies. Both are created and edited within Policy Builder.
For a network of sites, there are four types of policies: a Network Master Policy, Network Region Policy, a sitewide Site Policy and a site-specific Region Policy. These exist in a three-tiered hierarchy where the properties of a Network Master Policy and a local Site Policy cascade down to either a Network Region Policy (which can be used on multiple sites) and a local Region Policy (which can be used only on a single site).
Note: The action of creating a policy is separate from attaching it to a region on a homepage. Policies can exist without being associated with a region and regions can exist without policies (although without policies those regions won’t contain personalized recommendations).
A. Network Master Policy
A Network Master Policy contains properties that are inherited by all region policies across all the sites in a network. This is the highest level of inheritance. If ecommerce content is excluded in the Network Master Policy on a 100-site local news network with 10 regions on each homepage, ecommerce content will be excluded from all 1,000 regions across all the sites. There can only be one Network Master Policy per network. This policy is a great place to implement high-level exclusions for content category, source and type. This can only be created and edited on the network rollup in Newsroom, although they are visible from each site’s instance, as below.
B. Site Policy
A Site Policy contains properties that are inherited by all Region Policies on all of a site’s pages. It is similar to a Network Master Policy, but the scope is limited to a single site. For example, if you exclude all sports betting content by URL — /sports/betting/ — in a Site Policy on the homepage, all Region Policies attached to regions on that site’s homepage will inherit that exclusion, regardless of the number of regions. Each site can only have a single Site Policy, however.
Note: You cannot manually attach a Site Policy to a region on a page. Site Policies exist as an efficiency to set page-wide rules via inheritance to Region Policies.
C. Region Policy
A Region Policy is the primary bundle of rules which govern recommendation on an area of a page.
- A Region Policy can be applied to a single region or multiple regions on a page.
- A region can only have one region-level policy attached.
- Region Policies will inherit inclusions and exclusions from Site Policies and Network Master Policies.
D. Network Region Policy
Much like a local Region Policy, a Network Region Policy is the primary bundle of rules which govern recommendation on an area of a page. The only difference is that while a local Region Policy can only be used on a single site, a Network Region Policy can be across all sites in a network. Therefore, if you have common rules on a sports region (last 24 hours, category sports, content types text and video, source staff) across 100 sites, instead of creating 100 site-specific Region Policies, a user could create a single Network Region Policy and attach it to all 100 sites. Much like a Network Master Policy, this can only be edited from the network rollup instance in Newsroom but are visible in each site.
Note: You cannot manually attach a Network Master Policy to a region on a page. Like Site Policies, Network Master Policies exist as an efficiency to set network-wide rules via inheritance to lower-level policies.
Example: A Network Master Policy excludes content type video. A Site Policy excludes content source: Bob’s Best Betting Tips. A Network Region Policy used on a page would inherit both of those settings (video exclusion and source exclusion), in addition to any other settings added directly to that Network Region Policy.

Examples of the four policy types (network master, network region, page and region) seen from the lobby page of a single site.
POLICY BUILDER NAVIGATION
The primary Policy Builder UI consists of two pages: a lobby page displaying the existing policies and a detail page where policies are created or edited.
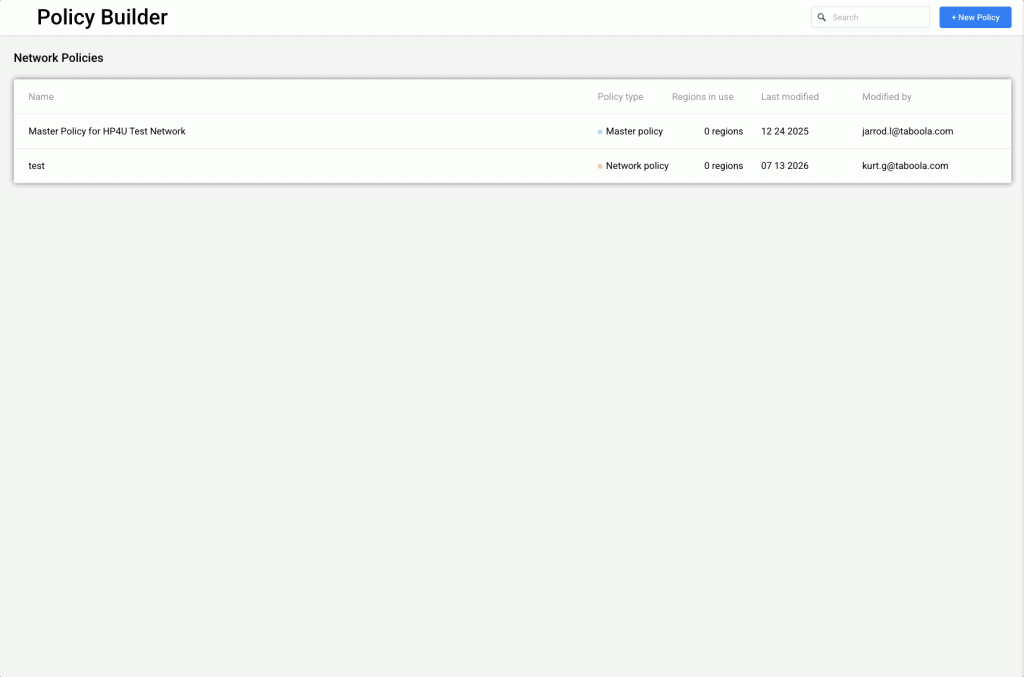
A. Policy Builder lobby page
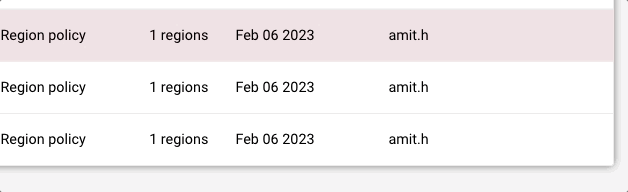
The Policy Builder lobby page provides an overview of all existing content policies, showing: name, inventory, policy type, regions in use, last modified date and the user taking that last action. It also has a search function that filters on policy name.
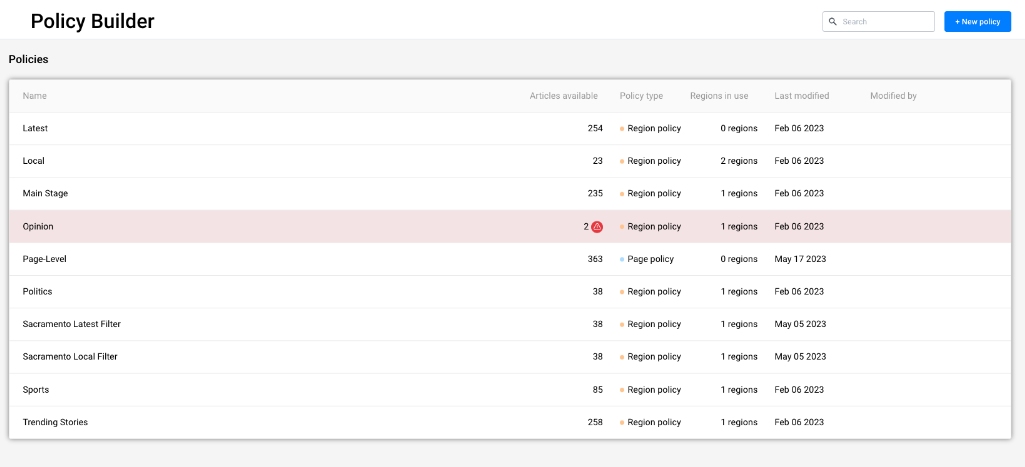
From this lobby page, a user has the option to create a new policy or they can select a policy to edit, delete or duplicate. To access these three functions, hover on the far right side of a policy row until the three dots appear, click, and then select the desired action.
- Edit Policy: This action allows an editor to make changes to existing policies. Note that any edits to an existing policy will affect the projected inventory, so be sure to “preview policy” after any changes are made and verify the projected inventory count.
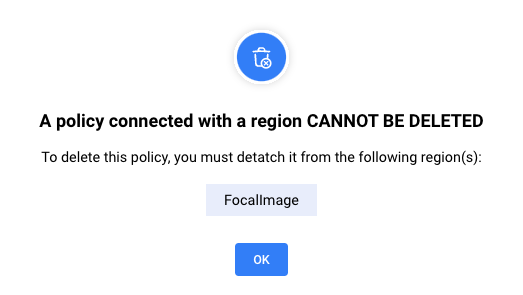
- Delete Policy: This action can only be applied to policies not attached to a region. An error will be shown if the user attempts this action to a policy actively in use.
- Duplicate Policy: This action creates and launches a copy of that policy in the main Policy Builder editing page, pre-populated with that policy’s settings. The policy’s new name is [source name] + “copy” by default, but it can be edited.
Note: For network policies, they can only be edited from the network level. You cannot edit a network master or region policy from the lobby page of a single site.
Low inventory warning
To ensure optimal recommendations, the inventory should have a minimum available item count. If a policy’s settings restrict available inventory below the desired threshold, a warning will be shown. In the earlier example, a warning icon is shown in the inventory count column and a red screen is rendered over the policy row because it has only two items in recommendable inventory.
To address this issue, a user could add more categories, lengthen the lookback setting, add a backfill setting or remove a custom filter limited inventory.
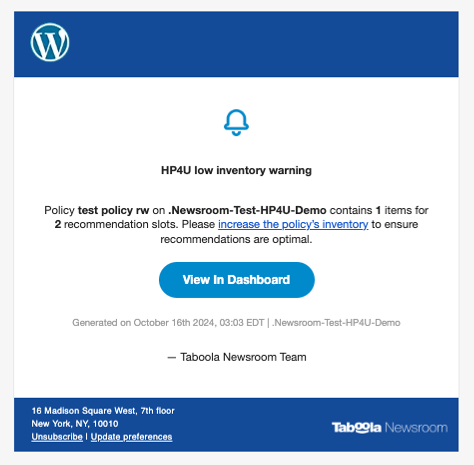
In addition to showing low inventory warnings on this page, users also are encouraged to sign up for low inventory alerts to help prevent issues where inventory is insufficient for quality recommendations. This can be accessed through the Manage Alerts page. Click the checkbox for “HP4U low inventory” Policy Alerts to subscribe and then toggle to the Notification Settings tab and select the delivery platforms desired.

This low inventory check runs once per day against policies attached to live regions. So while it’s not realtime, it’s meant as an additional support check. The messages are delivered by default in Newsroom and can be delivery externally to Slack and email, if configured. The alerts sent will detail the site, policy, number of personalized slots and the inventory for personalized recommendations. Clicking on the link will open the policy to edit properties to increase the inventory. Below is an example of an emailed alert.
Create new policy
Initially, when a user creates the first policy, they will be prompted to choose either a Site Policy or a Region Policy. But once the Site Policy is created, that step, shown below, will be bypassed.

On a network of sites, the same flow holds true. If there’s not a Network Master Policy from a network rollup in Newsroom, you will be prompted which type you want to create – a Network Master Policy or a Network Region Policy. Once a Network Master Policy has been created, that selection phase will be skipped.
B. Policy Builder editor
The Policy Builder editor page is the primary policy creation and editing interface. Any edit or create action taken from either the Heads-up Display or lobby page will take you to this page.
This page consists of tools for saving, closing, duplicating and deleting, a series of settings and filters, and a preview panel on the right.
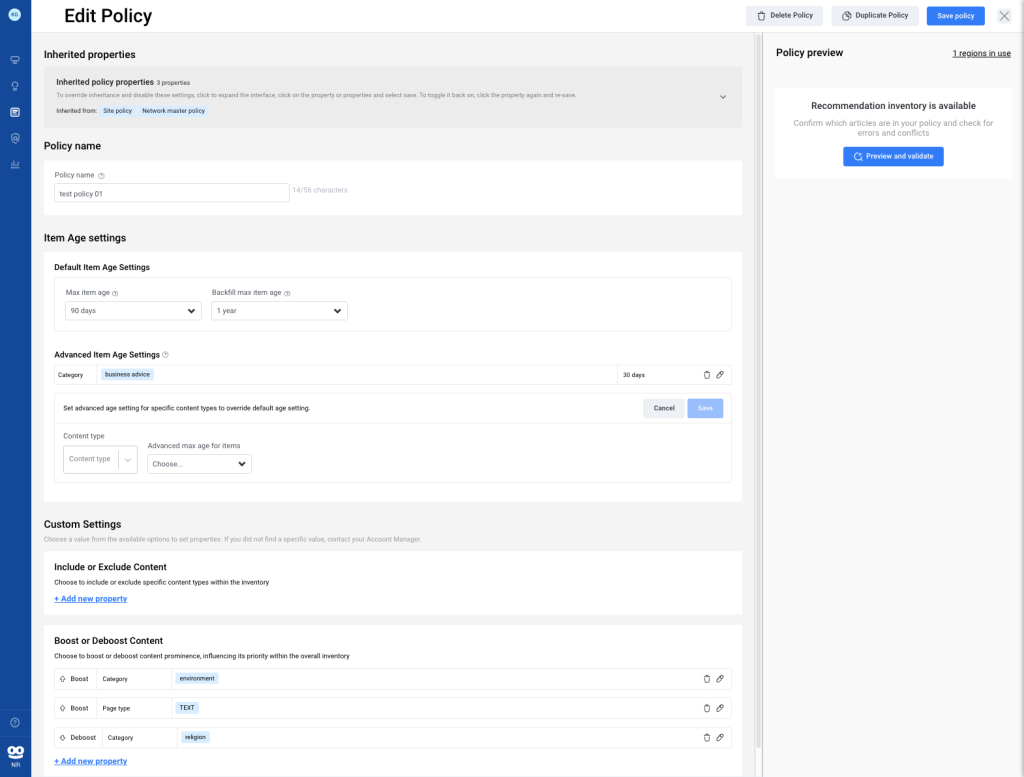
Inherited Properties
In a Region Policy, the first area at the top of the page is Inherited Policy Properties, which details what rules are inherited from Site and/or Network Master Policies. If you wish to adjust what policy rules are inherited, you have the ability to toggle each individual rule on or off. For example, a site might have a higher-level policy that excludes all Sports Betting articles. But for this region only, you want to override that rule and allow them.
To accomplish this, click the pill icon representing the inherited property you wish to disable. The pill icon will turn blue to indicate the change. You can preview what this change has accomplished. To finalize and make permanent this selection or selections, click Save. The disabled property then turns gray with strike-through text to indicate it is disabled.
In the example below, a user wished to disable the Site Policy inclusion rule of Categories Education, Space, Religion and Science). The inventory initially has 13 items. The user clicks and disables the four categories, previews the impact of this change, and then selects Save to finalize. There are now 8 items in inventory because there were five articles from those four categories which are no longer included.
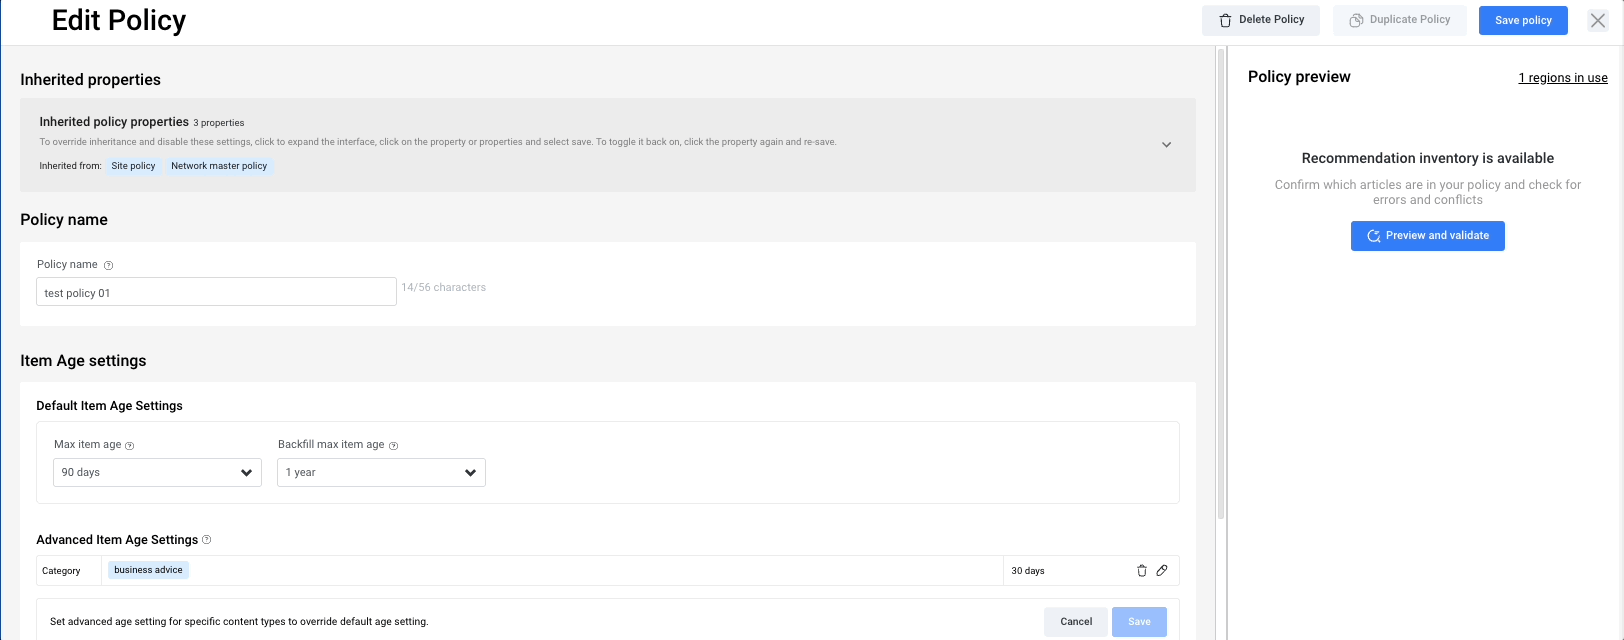
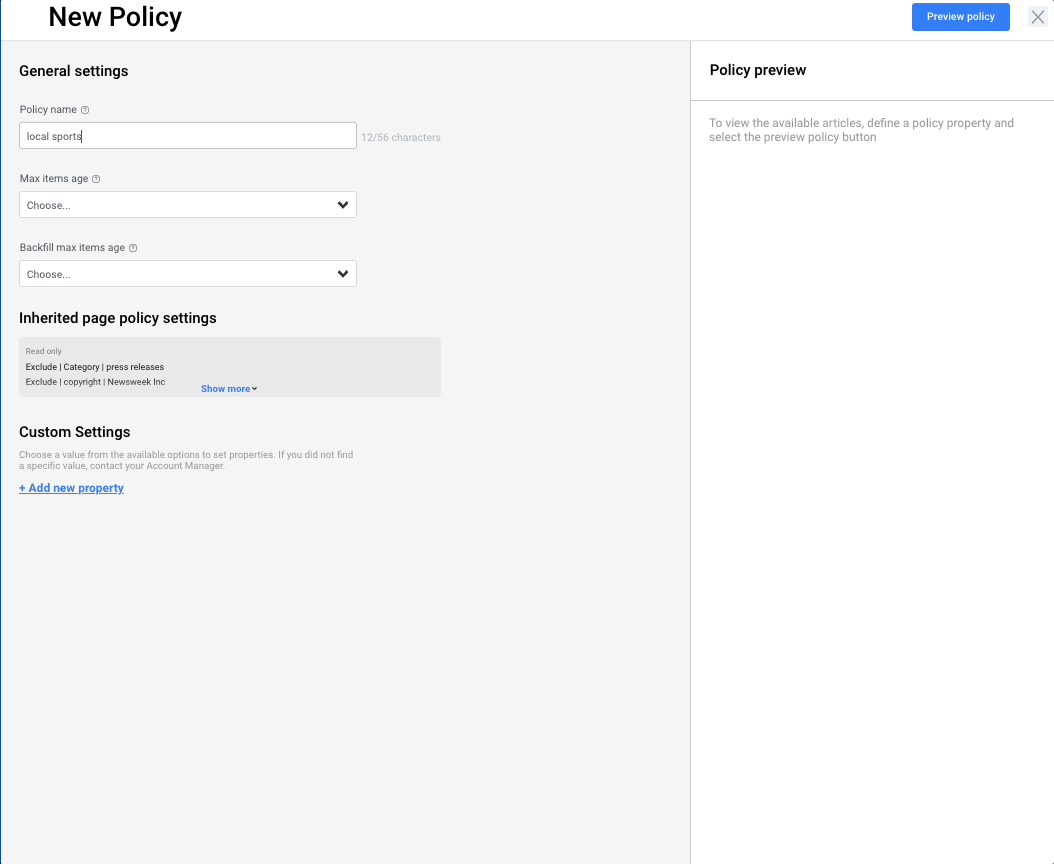
Policy Name
- Policy Name: Alphanumeric field, limited to 56 characters. It is searchable so it’s recommended to use critical keywords. Policy names must be unique. This is a required field.
Item Age settings
This area contains rules for how old recommendable content should be.
- Max Item Age: Indicates the look-back window for recommendable content. Content must be published and/or updated during this time period to be eligible. There are preset supported values, including: 12 hours, 24 Hours, 36 hours, 48 hours, 3 days, 5 days, 7 days, 14 days, 30 days, 90 days and 1 year. There also is an option to add a custom value in daily increments, including decimals. This is a required field.
- Backfill Max Item Age: A fallback setting in the event that there is insufficient inventory that meets the Max Item Age setting. Not required but recommended.
- Advanced Item Age: In addition to Max Item Age and Backfill to determine content freshness, the user also can set more specific lifespan requirements. In setting an Advanced Item Age on a property, a user is able to either extend content beyond the Max Item Age/Backfill settings or to shorten the Max Item Age recommendation window. Most properties mapped in Policy Builder can be tagged with a specific Advanced Item Age, but this is most commonly used with Categories, Content Sources and Content Types. Any content that matches the policy rules and does not have an Advanced Item Age set will simply follow the default Max Item Age settings. If it matches multiple Advanced Item Age settings, it will use the longest. Here below, a user is setting an Advanced Item Age of 30 days for content from Category Business Advice, capturing in recommendable inventory more of this evergreen-type content beyond the Policy’s fairly restrictive 24 hour Max Item Age and 3 Day Backfill Max Item Age.
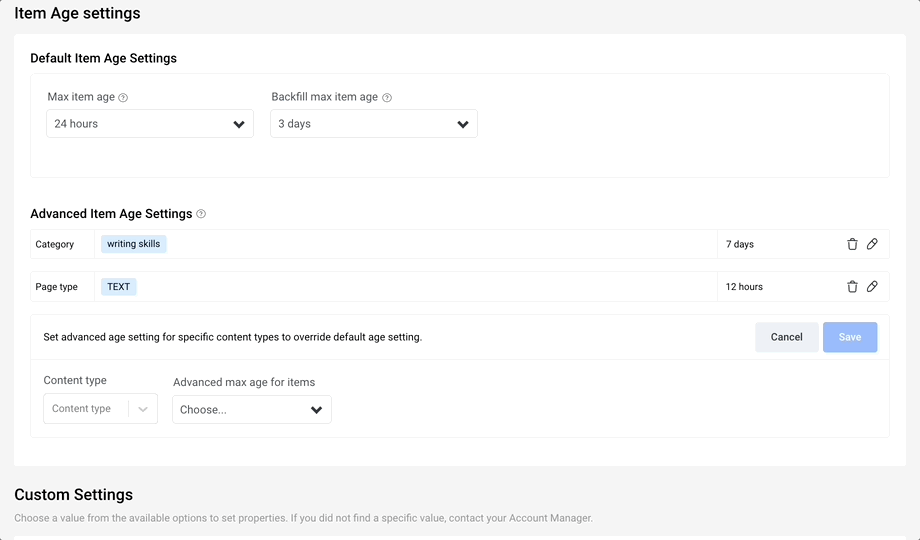
Good use cases for Advanced Item Age could include allowing photo galleries to be recommendable for longer than articles, staff content longer than wire service content, videos longer than photo galleries, investigations longer than breaking news coverage, or restaurant reviews longer than weather updates.
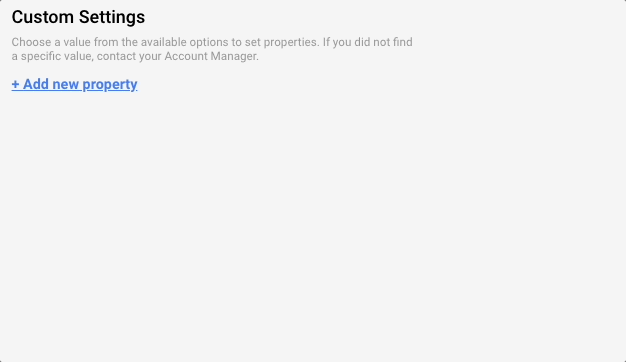
Custom Settings
Custom settings allow a user to more granularly tailor the recommendable content. As detailed earlier, all category values are contingent upon proper structured data mapping performed in earlier stages of the HP4U integration.
Applying a Custom Setting is done in two steps:
- Define your filtering rule, either include or exclude.
- Select the property or properties which will be included or excluded. These properties also can be later edited or deleted.
What custom settings are available is dependent on your site’s metadata and mapping. However, there are some global parameters which exist in all configurations.
1. Category
- Categories are drawn from mapped categories or site sections.
- The default empty represents “all”.
- It’s a searchable field.
- A user can include/exclude categories or sub-categories. When a user selects a top-level category, the subcategories automatically are included but can be excluded individually.
- A user can include a parent category (Business) but exclude a subcategory (Business/Stocks) with an “exclude category” filter. Example below is of including category sports and excluding category national sports.
- The list will only show categories that had at least one article published in them in the last 30 days.
- Categories up to three levels are supported, ie, /baseball/MLB/los-angeles-dodgers. Content more than three levels of hierarchy deep will inherit the level three settings, but can’t be directly targeted by a custom setting.
- Items that do not have a valid category will only be recommendable if a policy doesn’t have a category filter — which defaults to “all” categories.
- If you later add categories to a policy which already includes or excludes a category, it will add them to that previously established Custom Setting rule upon save rather than keep it as a new separate rule.
2. Page type
- Represents article, video, photo gallery etc content types.
- Default is “all”.
3. URL pattern
- Available for inclusion or exclusion.
- Open text field that supports partial match, ie -letter-to-the-editor-.
Two properties that are not available by default but that are commonly requested are:
Thumbnail pattern
- Available for inclusion or exclusion.
- A user might want to block articles with a site logo as the thumbnail image in content position that show an image.
- Open text field that supports partial match, ie /image/sitelogo.png.
- Users also can use the {site-domain} parameter in this field, which will infer the domain of the site being used. This is case sensitive.
- Example: {site-domain}/images/thumbnail.png.
- In the case below, the policy uses {site-domain} to limit the content to the canonical domain which matches that site and excludes content that has a generic thumbnail image from that site’s image library.
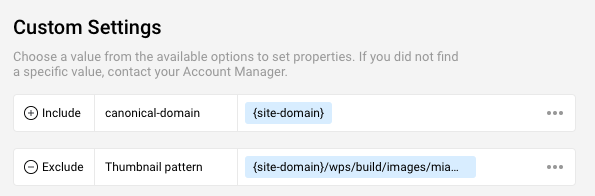
Canonical-domain
- Available for inclusion or exclusion.
- Open text field that supports partial match, i.e., mysite.com and www.mysite.com both work.
- Users also can apply a {site-domain} parameter to this field.
Boost and Deboost
Policy Builder also allows publishers to directly influence the recommendation algorithm to help better optimize toward specific outcomes — “boosting” or “deboosting” those settings. Read the full guide for details and best practices.
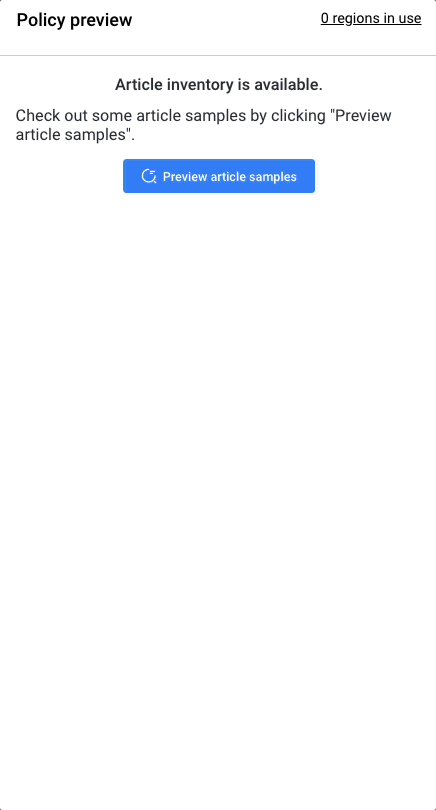
Policy Preview panel
The area of Policy Builder allows you to validate the accuracy of your policy by showing you a sample of the recommendable inventory. This is based on the combined rules of the Region Policy and inheritance from Site Policies or Network Master Policies.
The preview panel will display the number of regions in use, the primary projected inventory and the projected backfill inventory. Note: There’s some caching here so while the numbers will be fresh they are not real time.
Most importantly, this panel displays the category, headline and thumbnail image of as many of 20 of the most recent items which match this policy.
In essence, this preview panel allows users to proof their work, including identifying accidental conflicts. For example, if an editor includes a category “shopping” but excludes /shopping/ by URL, there’s no true error message. However, you will see shopping content has been excluded in the preview panel and the inventory would be 0 if that were the only category.
From a Network Region Policy, the preview pane function varies slightly. When first previewing a policy attached to multiple sites, a user is able to view the top level inventory numbers for each site and see any errors. However, to see the sample inventory, a user must select a site individually.
Full-flow policy creation example
In this flow below, a user names a policy, selects a max item age and backfill age, selects two categories to include, excludes wire service content and then previews the policy to ensure the content is as desired.