Chrome Extension Heads-up Display (HUD)
The Taboola Newsroom Heads Up Display (HUD) is a Chrome extension with a series of features related to Homepage For You (HP4U) deployment validation, configuration and operation.
Once the Chrome extension is downloaded, installed and pinned (see right), users can log in with their Taboola Newsroom account. The Chrome browser will periodically check for new versions of the installed extension and it automatically updates. However, it can take up to several hours for the browser to detect that a new version of the extension is released.
Once installed and logged in, to use, open and activate the Chrome extension with the toggle on the upper right on the UI.
![]()
I. GEAR ICON
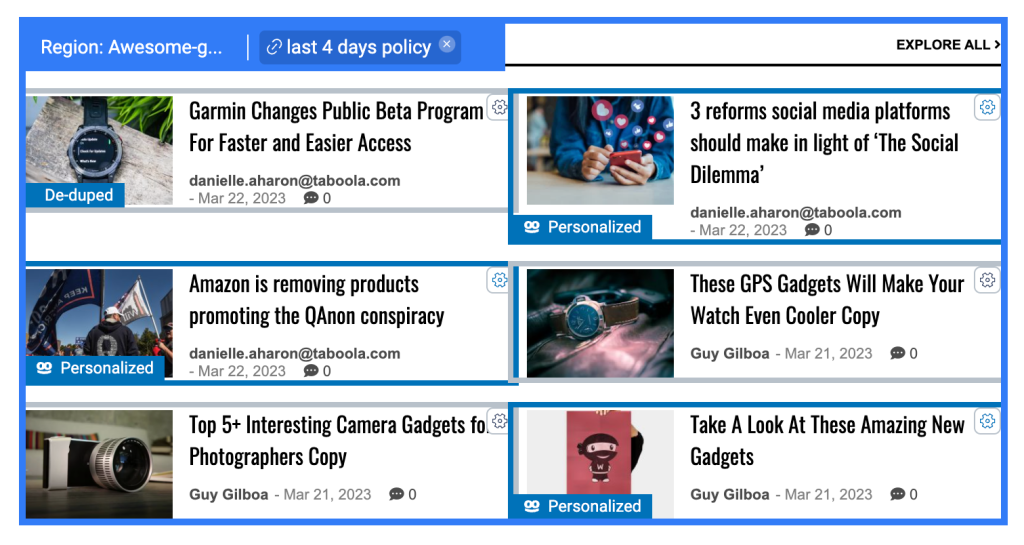
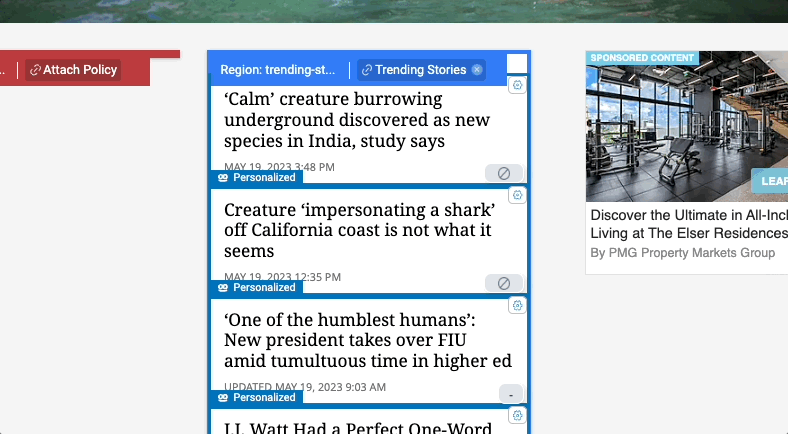
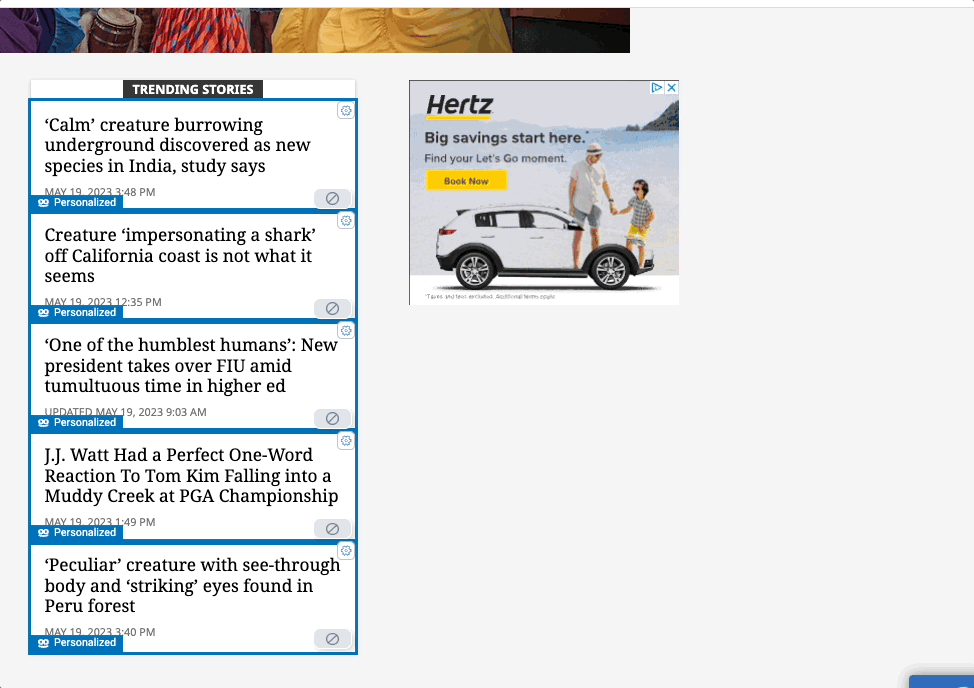
Uses: Marking content positions “Personalized” or “Deduped” and temporarily pausing personalized recommendations.
Each properly tagged and identified content position will have a gear icon in the upper right corner. Clicking on this accesses several functions.
A. Enabling personalized recommendations to be served in a content position
- Click the gear icon in the upper right corner of the content position.
- Toggle on “Personalize this slot”.
- Select save and confirm. Note: You can mark multiple slots personalized and then bulk save.
- To indicate personalization was successful, the position should have a blue border, a Taboola icon and the
- “Personalized” label in the lower left corner.
B. Enabling deduplication on a content position
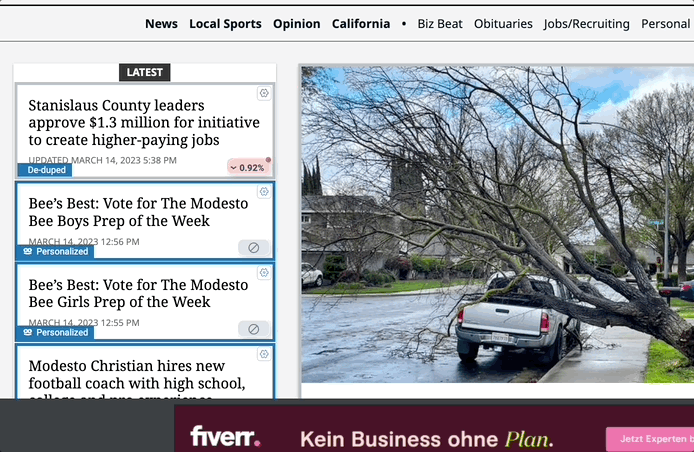
This setting is used to ensure that content placed by editors in curated positions is not duplicated in personalized slots anywhere . Content in personalized slots is deduplicated with other personalized slots by default.
- Click the gear icon in the upper right corner of the content position.
Toggle on “Do not repeat”.
Select save and confirm. Note: You can mark multiple slots de-duped and then bulk save.
To indicate de-duplication was successful, the position should have a “De-duped” label in the lower left corner.
Note: No more than 30 content positions on a page can be deduplicated. Attempting to do more will result in an error.
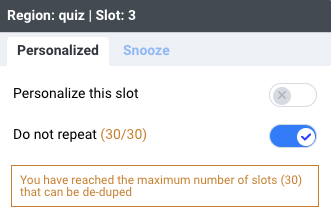
If your homepage contains more than 30 curated content positions, it’s recommended to de-dupe the ones that are most prominent on the page.
C. Pausing personalized recommendations for a content position
To temporarily pause personalization in content positions, editors are able to snooze recommendations for preset intervals of time, depending on anticipated need. Personalization can be paused for the following intervals: 2 hours, 4 hours, 8 hours, 12 hours, 24 hours, 48 hours and 7 days.
- Click the gear icon in the upper right corner of the content position.
- Select the “snooze” tab.
- Toggle snooze on.
- Select save.
- To indicate personalization was successful, the position should have a “Snoozed” label in the lower left corner and indicate the remaining time.
- Once the snooze time has expired, personalized recommendations will resume.
II. POLICY MODE
Uses: Attaching a policy to a region, launching Policy Builder to create a policy or edit an existing policy
A. Attaching a policy to a region
While the recommendation policies that govern homepage personalization are created in Policy Builder, they are attached to regions on the page in the HUD. To activate the UI which allows this, you need to enter Policy Mode by:
- Launching and activating the HUD.
- Switching to the “HP4U Policies” tab.
- Toggling Policy Mode on.
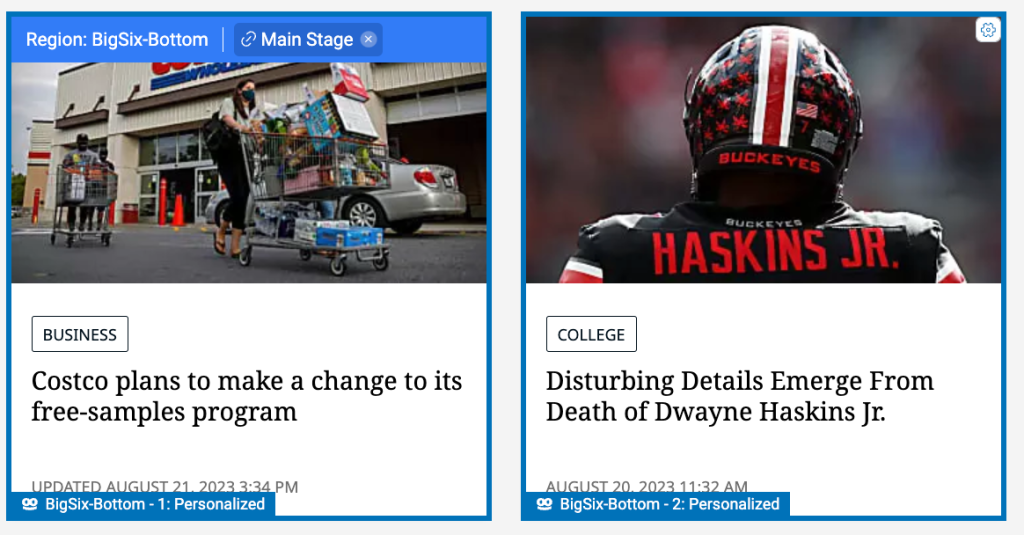
Once Policy Mode is on, each region will have either a red border and tab indicating that it has no policy attached to it or a blue border and tab indicating it has a policy attached.
No policy:
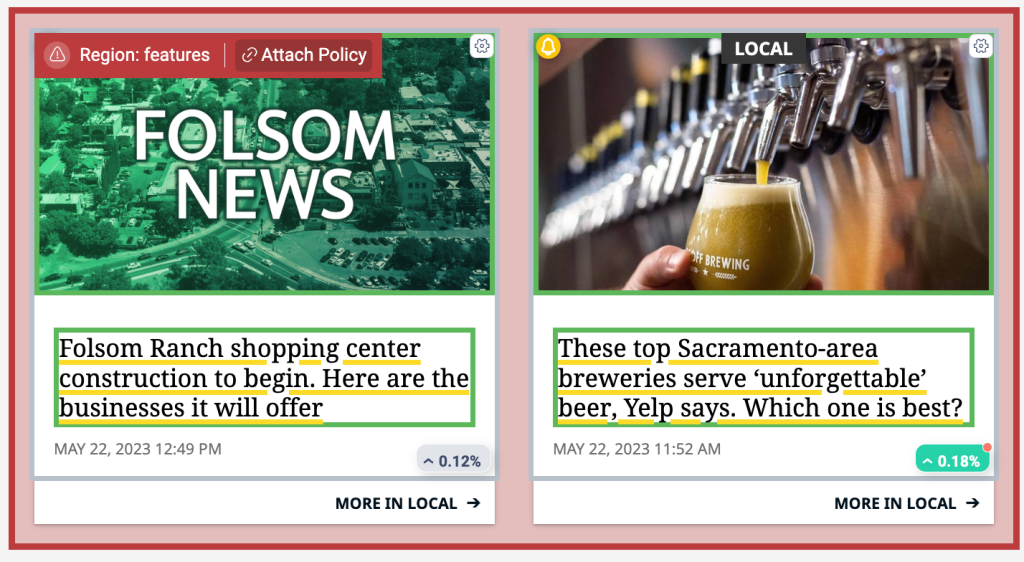
Policy attached:
If exact number of items in a region cannot be determined, the region header will display across the first item only, there will be no box outlining the borders of the region, but the region name and position number will be prepended to the lower left status indicator (see example below). In the way, users can see which items are contained within a region. The functionality is the same despite the UI change.
In cases where the region name or policy name are truncated, you can hover over the names to see in a tooltip the full name.
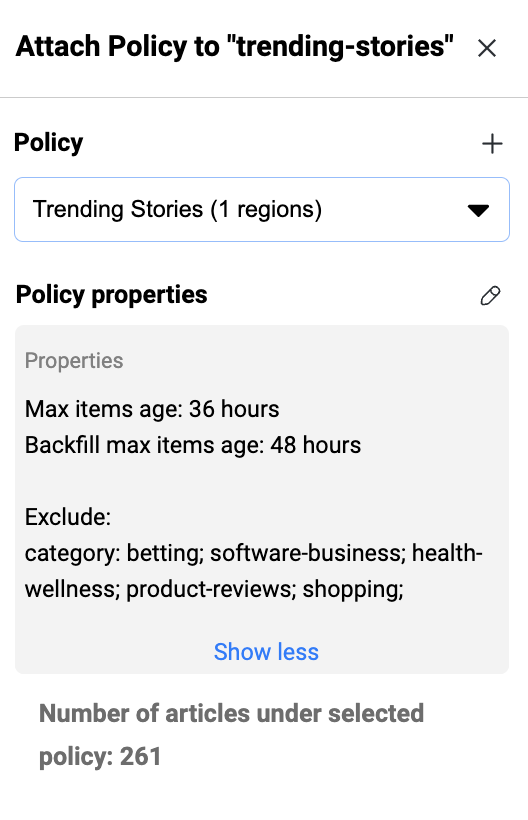
To attach a policy to a region, click anywhere in the Attach Policy tab to launch a flyout panel on the right.
In this panel, you can:
- Select a policy to attach from the pulldown.
- You also can see in how many regions this policy is used in the parenthetical notation following the name.
- Preview the properties of that policy. This does not include inherited properties.
- You expand (“show more”) or collapse (“show less”) this window.
- View the number of articles in inventory for that policy to ensure it has enough content for that region.
- Edit the policy selected in the pulldown to launch Policy Builder by clicking on the pencil icon.
- Launch Policy Builder to create a new policy by clicking the cross icon.
- Note: If you create a new policy, you will have to reload the flyout panel to see the policy, as the list is populated on initial load.
- Save the changes you made.
- Once saved, you should 1) See the new policy name in the region tab and 2) If the region had no policy, the border and tab should switch from red to blue.
Full flow example of opening the HUD, turning on Policy Mode, and attaching a policy called “test policy” to the region “BigSix-Bottom”, and saving the change.
B. Detaching a policy from a region
To detach a policy from a region, click the X to the right of the policy name. Note: Since the Chrome extension uses local storage, if you switch between sites with HP4U enabled, you may have to turn the Chrome extension off and back on if the feature isn’t functioning.
- Launching and activating the HUD.
- Switching to the “HP4U Policies” tab.
- Toggling Policy Mode on.
- Click the X to the right of the policy name
- Click “Detach policy” from the confirmation UI
III. VALIDATE PUBLISHER MARKUP
Uses: To check the accuracy of HP4U tagging, adding new regions which will serve personalized content
A. Validating publisher markup
To help ensure all necessary HP4U tags are attached to the proper elements, publishers should validate the process during deployment to check for missing tags, misplaced tags and mistagged content positions.
To validate HP4U tagging and markup:
- Open the HUD and navigate to the Validation tab.
- Enable display pages markup. There are two types of validation which will occur.
- One automatically checks critical page issues like a region nested within a region. These will be immediately displayed.
- The second check requires a user to manually select which tags that they want to validate for, such as title or link, since content positions vary in the data they contain. Many might not display an image or description .
- Select with the checkboxes what tags you wish to validate. There are currently 13 options, not all of which will apply to every publisher.
| Tag validation options | |
| Title | Hidden |
| Link | Category |
| Image | Premium |
| Kicker | Video |
| Publish date | Extension |
| Description | Custom attribute |
| Author | |
- Once selected, these will be displayed along with the automated error and warning messages.
There are three types of messages: a valid state (green), a warning state (yellow) and an error state (red).
- A green valid message means no errors were identified. A yellow warning message means there might be an HTML tagging issue, depending on the implementation. Some warning messages do not represent an error. The red error message means a material tagging or structure error.
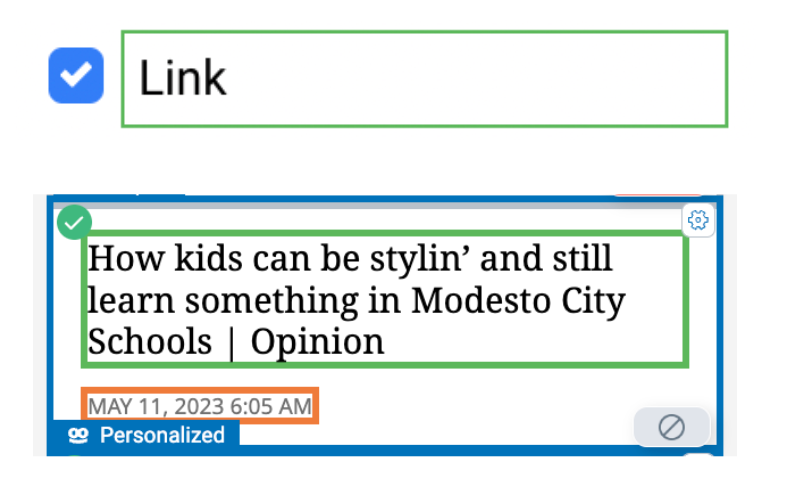
- Note: If you attempt to validate for a tag that isn’t present in the design, you will see an error message that does not represent an issue. Below, a user first successfully validates the title and link, both of which are present. But an error is thrown once the user attempts to validate for an image and kicker, neither of which are present in the design. This is falsely showing as an error as these elements do not exist.
- In addition to the messages, each tag validation (title, link) also will show the position of the validation, displaying a border that is color-coordinated with the tags UI. The border around the “Link” validation is green, matching the green border around the link position wrapping the headline.
The HUD current checks for the following warnings and errors.
| Check | Is Error or Warning |
| missing data-tb-link on additional <a> tags | warning |
| data-tb-link is missing on slot | error |
| data-tb-link is not on a <a> tag | error |
| background images not on <img> tags | error |
| data-tb-image is not a <img> tag or have background image | error |
| data-tb-category is not on an <a> tag | warning |
| missing data-tb- attributes on a slot if checked in HUD to validate | error |
| orphaned items (no region) | error |
| attributes are not placed on the lowest element in the DOM (data-tb-title, data-tb-description, data-tb-category) | warning |
| more than 1 data-tb-title in a slot | error |
| more than 1 data-tb-thumbnail in a slot | error |
| more than 1 data-tb-description in a slot | error |
| more than 1 data-tb-category in a slot | error |
| nested region | error |
| nested slots | error |
| multiple regions with the same name | error |
| orphaned link, titles or thumbnail images on a page or a region | error |
| data-tb-link/title/thumbnail tag placed on a data-tb-region-item | error |
| Region contains no items | warning |
| Slot contains non-tagged images (missing data-tb-thumbnail) | warning |
B. Updating the Homepage For You structure
If a publisher updates the structure of their page, such as adding or removing Politics or Sports modules, they also have to adjust the structural configuration of the page.
To save the HP4U region map:
- Open the HUD and navigate to the Markup and Region Map tab.
- Ensure the markup is valid, as above.
- Select “Save Region Map”.
- The operation has been successful if HUD displays the “Successfully Saved Region Map”.
